last updated 30/04/2015
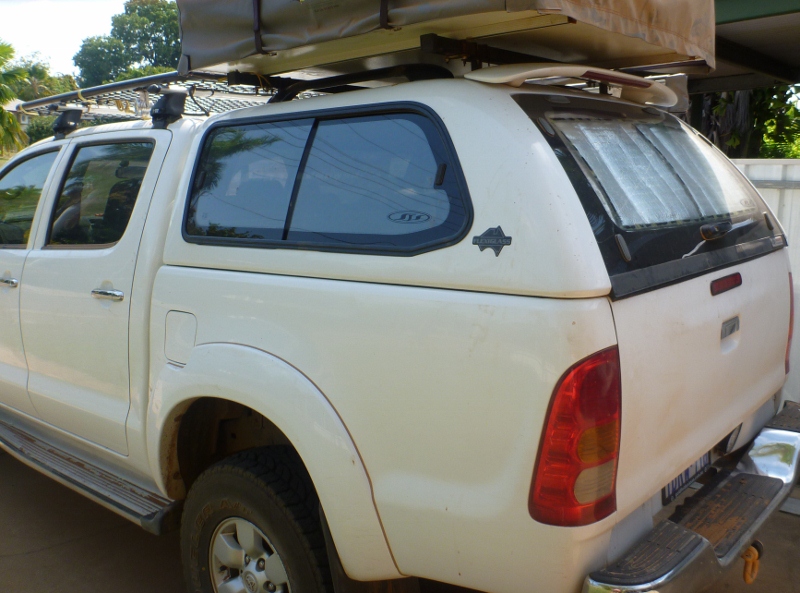
To tour around Australia in a four wheel drive ute usually means you’re going to need a canopy for the tray to provide you with a large protected storage area. My canopy is a Flexiglass Sport. The reason I got it – it came with the car. The previous owner got it. So I have not really looked at anything else, just made do with what I got. It’s not the current sport model and it’s at least a few years old, probably similar age of the car which is a 2007 model.
This canopy is sleek, looks good and seems strong. Build quality is good. Fittings seems decent quality. With this style of canopy it gives the car more of a trendy wagon type look to it rather than the more commercial looking styles. It looks more aerodynamic too, flush with the cabin roof, so may offer a slight fuel saving, and means the roof racks over the canopy are the same height as those over the cabin. It’s endured some tough corrugations and off road tracks. My version came with sliding side windows, which are quite annoying to open. I think the newer models have lift up windows which are much better. Sliding windows are good if you want to leave them open whilst driving, for example to feed fresh air to a dog riding in the back. But lift up windows are far superior in terms of easy access to stuff inside.
The rounded, trendy look does come with disadvantages. The rear opening is quite rounded, so access is not as good as it could be. I often bump the edge of the opening when pulling stuff out from on top of my drawer system, especially between the fridge and the side of the canopy where it is quite narrow. The rear window is also at quite a shallow angle, cutting off a fair bit of storage space. It means my fridge, which sits on top of my drawer system on a sliding top, is set forward a lot more than it otherwise could be, and I have a lot less room in front of the fridge. Being flush with the top of the cab also means there is less vertical space than some other canopies. A little bit of extra space on top would be nice when you’re packing it to the brim. Even if you don’t use the extra space it makes it easier to take stuff in and out. Mind you I’m not sure if I’d like a higher canopy, because it would make the roof top tent sit awkwardly high and further increase drag. I like the whole roof rack system being level from the cabin to the canopy. Makes the annex fitting neater too.
So there are some pros and cons to consider when deciding between a sleek canopy and a more boxy high profile canopy. But the worse thing about my canopy is that there are no roof racks made to suit it. I thought Flexiglass would offer some sort of solution to support their products but they have nothing. The roof rails that come with it are basically for looks only. I needed roof racks to fit the roof top tent onto. I had a few options:
- Use rhino internally supported canopy roof racks. These can be fitted to any canopy. They penetrate the canopy and come down to the floor of the tray. The canopy is not loaded – all load is transferred to the floor. I could not use these because the floor mounting would interfere with my drawers.
- Get some custom made external bar work that runs around the outside of the canopy. Expensive and ugly.
- Replace the canopy with one that does have purpose designed roof racks capable of carrying a roof top tent. I almost went down this path. Would have got a more accessible canopy, lift up side windows, and proper roof racks. I thought it was wasteful to throw away a perfectly good canopy though, without first giving it a proper go.
- Get some cheap generic adjustable roof racks and see how they go. This is the option I took.
So I bought some generic steel internally supported roof racks from ebay. Because they were so cheap I wasn’t risking much money. The worse case is I stuff up the canopy and I’d need a new one, which was an option I was considering anyway.
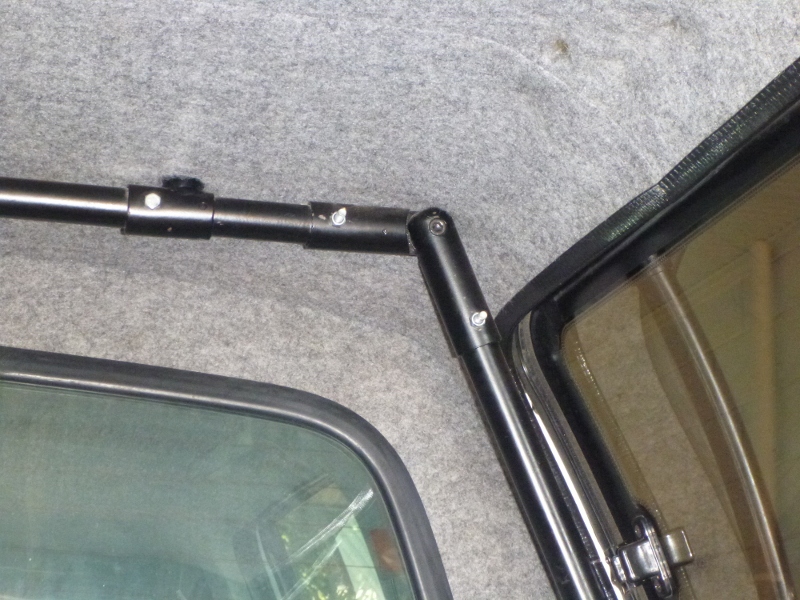
The roof racks penetrate the canopy in a similar way that the rhino ones do, but instead of coming down to the floor they come down to the sides of the tray. The canopy itself is not loaded. They are made from tubular steel which you measure and cut to size to suit your installation. Needless to say, installing it was tedious and painful process. Drilling holes through the canopy, making measurements in mid air guessing where the internal supports would sit and how long they need to be, lots of hack saw work cutting the tubular steel, and aligning and drilling holes through the tubes to fit the bolts that hold everything together. It was a good few days work for a part time amateur like me.
Because of all the joins and bolted together tubes, the roof racks wobble a bit. They aren’t rock solid. Further, the diameter of the fittings that hold the tubular sections together are slightly too big. When the bolt is tightened, it squeezes the fitting but does not quite clamp down tight enough onto the tube inside. This makes the whole structure feel even looser. The rubber grommets that came with the kit to seal the penetrations through the canopy were not strong enough to withstand off roading with a roof top tent. They disintegrated, making the racks even looser as they wobbled in the gap where the grommets used to be. I had to fix it in the field with some bits of rubber and glue. Doesn’t look great but sealed the hole and made the structure feel a bit tighter again. Because the racks wobble slightly, any off road bumps do get transferred slightly to the canopy via sideways movement through the canopy penetrations. There’s probably a risk of damaging or cracking the canopy if there’s a big enough impact.
It’s not all bad. With the roof top tent installed and bolted down firmly, it squares the whole thing up and makes it feel much firmer. Without the roof top tent it is very wobbly. The fittings and steel tubing are strong – it’s hard to go wrong with a basic steel design. The nuts that came with the kit are nyloc and have worked fine over all the four wheel drive tracks and corrugations we’ve traveled. Installing the annex, which fixes the rear canopy roof racks to the roof racks on the cabin, also reduced wobble. I fixed the annex with an angle bracket and u-bolts. Note you should not usually rigidly tie down an object between the cabin and the canopy due to movement between them as the chassis flexes. It can and has caused damage to vehicles. I get away with it because the canopy roof racks provide the movement to cater for the flex. So you could say the wobbliness is actually an advantage.
Despite being far from perfect, they have worked ok so far, done the job of holding the tent over some tough off road conditions, and nothing structural has been damaged or broken. Considering I didn’t have many options, and how cheap they are, I think the end result is reasonable. With better grommets and tighter fittings, they’d make a decent roof rack. Perhaps someone with more skills could improve it by welding or fitting rubber sleeves within the fittings to improve tightness, or some other ideas like that. The way they are in my installation is a bit dodgy, but bearable. As long as nothing breaks it’s good enough for me to leave on permanently. Before you buy a canopy, check what’s available for roof racks so you don’t run into the same issues I did.
The Flexiglass canopy is quite good in terms of dust sealing. It fits tightly onto the tub and does not appear to let in dust around the windows or rear opening. It has a flap on top that can be opened to let in clean air whilst the car is moving forward, pressurising the inside and reducing dust ingress. When traveling for long periods of time in very dusty environments there is still some dust that gets in through the tailgate. To reduce the dust I installed some rubber seals up the sides of the tailgate and a foam tape seal across the bottom. This significantly improves sealing and reduces dust ingress.

Cross section of the rubber seal I used to improve dust proofing of the canopy area. Note the metal insert which adequately holds the seal onto the fixing location.
With the trendy aerodynamic look, dodgy but functional roof racks and extra dust sealing I’m pretty happy with my arrangement. It’s functional and fit for purpose. Maybe one day I’ll get sick of opening the side windows and upgrade the canopy with something with lift up windows and a better roof rack system.
Checkout outbackjoe on facebook
See also:
Roof Loading and Roof Top Tents
After Market Add-ons and other Camping / Touring Stuff


Hi Joe love the article can you tell me how I can get hold of the supports you got for the inside of your canopy to support the racks for the roof top tent I have had a look on Ebay but cant find them anywhere. regards Stuart.
Hey Stuart yeah I can’t find it on ebay anymore, I think these are the dudes that supplied it: http://www.3xm.com.au/
hi Joe ,great article about rooftop tents ,have used a dome swag up till now but the missus doesn’t like it anymore after a native mouse got into the swag in flinders ranges (she was more worried about the snake chasing the mouse) so a rooftop tent is on the cards.your article has given me ideas on what to look for.
regards Darryl
Yeah roof topper is good for making the ladies feel more secure against wild intruders. You don’t want to give them any excuse to not come camping else you’ll end up forking out for expensive accommodation!
Hi Joe…i am dealing with a lot of dust coming into my Flexiglass canopy. I am in touch with Flexiglass to suss out the appropriate vent to equalise canopy pressure. However your seals got me thinking and I wondered where you purchased them? Cheers Steve
Hey Steve I got it from Clark rubber. Nothing special, might be called door trim seal or something I forget. The seal combined with having the top vent makes it pretty good but still I get dust in when doing hundreds of kilometers over bulldust.
Gday Joe,
I have a SJS sports Canopy like yours.
Great Canopy, SJS state the load limit is 80kg.
I’m guessing I need to reinforce the canopy similar to yours?
Hey mate I never checked the specification for mine but by the looks of the rails and lack of any internal re-inforcement in the design of the fiberglass shell I don’t think I’d like the tent on there especially offroading. But then if the spec says 80kg you should be able to mount it straight on.
Thanks mate,
What about the static load of 2 Adults in the the rooftop tent?
If it can take 80 dynamic then should be fine but 80 sounds like a lot for a fiberglass shell with no ribs or structural mouldings or anything. If you trust the 80 dynamic then should be okay for more static.