
last updated 21/02/2016
Trying to figure how you’re going to pack all your stuff for touring and camping? A good option are storage drawer systems. Check out what we did in the tray of our Hilux 4WD specifically for touring around Australia, hopefully it gives you some ideas.
For more information on some of the equipment mentioned in this article, click here.

What to do with this space? How will we fit all our camping gear?
Good storage is important when touring the outback. You want to maximize available space and make it as easy as possible to access your gear. If you’re not towing then it’s especially important as packing space is at a premium. We needed something for our touring vehicle, and looking at the off the shelf systems, I couldn’t find anything that exactly met my requirements. I wanted:
– aluminium internals to reduce weight.
– simple, light and effective, even at the expense of appearance. I’m not going for a fancy checkerplate and stainless steel look. That stuff is heavy and expensive and I have no skills to work with it. I just want something functional. I’m not trying to be trendy.
– marine ply drawer fronts and tops since it’s strong, easy for me to work with and is water resistant.
– integrated full extension fridge slide on one side.
– integrated full extension work bench on other side.
– drawer internal dimensions high enough to fit the thermomix (approximately 320mm).
– utilize as much of the tray area in our four wheel drive as possible
– leave some space to fit a water tank somewhere
I looked at the systems available from ARB, Black Widow, Ironman, and a few others. They all seem to be pretty good, but they’re really heavy and didn’t meet my exact requirements. There aren’t many alternatives if you want aluminium. I went for Off Road Systems DIY drawers. These are internals only. Off Road Systems do provide fully kitted out drawers, but not to my requirements. I got two equal single drawers with double runners, 540mm wide x 280mm high x 1280mm deep. The space between the wheel arches on a 2005 to 2015 Hilux is around 1100mm, so these two drawers side by side fit perfectly. The depth of 1280mm is pretty long. Remember this is the drawer internals not the overall finished dimensions.
The drawers from Off Road Systems are good quality. They are light and feel strong and the runners are sturdy. I’ve loaded them up with a lot of gear and have driven on some pretty rough stuff. They’ve worked perfectly so far.
The total depth of the tray in a 2005 to 2015 dual cab Toyota Hilux is around 1600mm. So the 1280mm depth drawers leave me 320mm of space. Allowing for some space at the front, enough for the drawer fronts, locks and a bit of clearance to the tailgate, leaves a void perfect to fit a 55L poly water tank (depth 200mm), with a few mm of space to fit some padding to protect the tank. This is the beauty of having a ute – a large tray to fit long drawers and a water tank.

The Offroad Systems drawer internals sitting in the tray of the Hilux. At the far end of the tray you can just see the 55L poly water tank.
All flat panels in my system are made from 12mm marine ply. Load bearing rails and made from solid hardwood timber.
For the slide out fridge slide and work bench, I got some Dunn and Watson 227kg lockable runners. These are heavy duty 100% full extension runners that are available in various lengths. Mine are 1219mm long – the closest match to the Offroad Systems drawers. They are in the 227kg model range, but this just defines its construction. Load rating varies according to slider length, with longer lengths derating the load capacity. The 1219mm versions are rated to 170kg which is still pretty good.
The fridge slide sits on top of the left drawer. The runners are supported by 25mm thick, 75mm high solid timber rails. These rails sit on top of the aluminium drawer internals. The sliding fridge shelf itself sits on another set of timber rails that attached to the extending part of the runners.
Note most of the photos below were taken after about a year of bashing around Australia. Needless to say everything looks well worn and pretty dirty. I try to take care of my stuff but going bush loaded to the brim and getting hammered by corrugations and off road tracks is really tough on vehicle and contents, especially if you do several thousand kilometers of it. My drawers are looking rather used and abused but they’ve held up ok.

This is the left side of the fridge slide out shelf. The left timber rail is fixed to the top of the aluminium drawers. The right timber rail slides out with the runners. The fridge slide panel sits on top. The same arrangement is duplicated on the other side of the fridge slide.
The runners on top leave a void between the top of the aluminium drawers and the underside of the fridge slide. I cut out the front cross member of the drawers so that the void became usable space and increased the internal drawer height to around 330mm – enough to fit the Thermomix.

Cutting out the cross member at the front of the drawers left them vulnerable to swaying side to side and becoming fatigued. To combat this I riveted the left drawer to the right drawer. I also made a bracket to support the side wings that wedged up against the side of the tray, ensuring the aluminium drawers could not move. I got L-brackets with a diagonal strut cross member. The diagonal strut is a bit annoying, getting in the way of accessing the side areas, but it makes the bracket much more rigid.

I got this L-bracket from Bunnings. I extended it so that the cross piece touched the side of the tray, with a small rubber stopper to protect the tray. The L bracket is riveted to the aluminium drawers which also helps prevent it buckling from the weight of the fridge. The right side L-bracket wing support is identical.
The completed fridge slide is sturdy and takes the weight of a fully loaded 80L Waeco fridge.

The work bench is constructed with a similar arrangement of timber rails and runners to the slide out fridge, except it sits under the right hand drawers. Putting it on top would make it too high.

The work bench works really well. It takes a few seconds to deploy and provides a sturdy platform to prepare food. We use it every day. Under the work bench I mounted another set of runners so we could have a sink. The sink dropped straight into the cutout. We don’t have the sink anymore because we didn’t use it enough. We could never leave it set up because it means we can’t lock up the tail gate which exposes it to thieves and vermin. It was too much work to keep installing it and removing it so we didn’t end up using it. Plus, in the outback, you don’t need to catch your washing water in a sink. You just let it run straight on the ground!

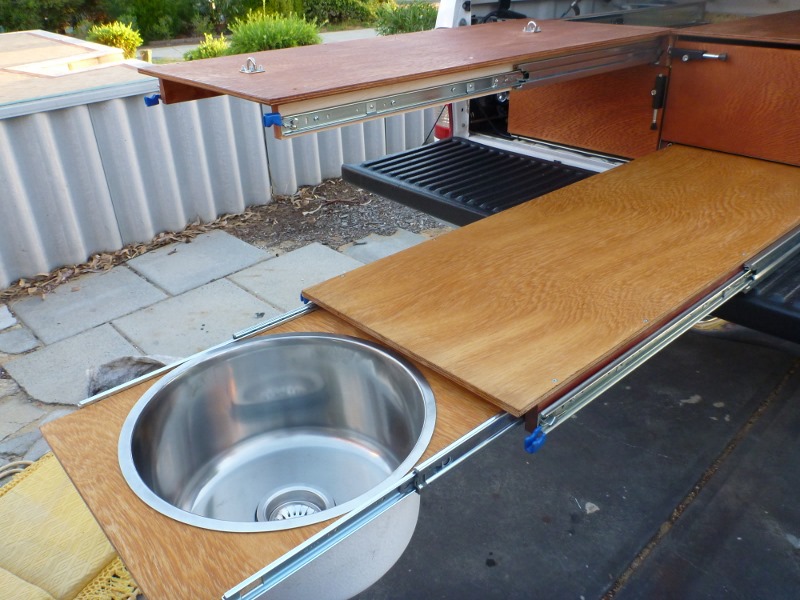
The sink was a hassle to use and took up valuable space which left it susceptible to culling. It is no longer with us.

With the work bench extended and our camp kitchen setup ready to go, it looks like this.

The Hilux Camp Kitchen. This arrangement has the drawback (drawerback?) that you can’t open the left drawer when the hotplate is on the tailgate and you can’t open the right drawer when there is stuff close to the drawer on the work bench.
I did not put handles on the drawers, instead I left a gap on top. This is safer, as you cant’ chop your fingers off from slamming them in a drawer. There’s a lot of inertia behind these drawers when they’re loaded with gear.

I fixed the drawers to the base of the tray with self tapping screws. I wanted to use bolts, but access was a real pain underneath with the main chassis rails, cross members and fuel tank all getting in the way. I fitted aluminium L-channel to the timber rails on the slide out work bench to provide a fixing point for the screws from the top. I used some fairly large self tapping screws, hopefully they can endure the stress of corrugations. After many years of abuse they’re still holding up. I’ve since realized there are some bolt solutions that do not require access from below. You slot them in from above and they expand when tightened. Would have been stronger than the self tappers I used.

You can just see the top of a self tapping screw in this shot, and its reflection on the underside of the aluminium drawers. Also visible is the cable running across the front of the drawers feeding power to the fridge.
From under the vehicle I sprayed cold galvanizing zinc paint to all the screw penetrations. I also applied a coating of spray putty. The zinc paint and spray putty combined hopefully provide a good barrier to rust and also help lock in the screws. Hopefully it prevents the screws from vibrating loose.
I used Whitco patio bolt locks to lock the drawers. I made one of the timber rails over sized to that it protruded past the end of the drawers, providing an area for the bolts to lock into. I put some aluminium L-channel over the end of the timber rail to strengthen it against intruders. When locked the patio bolts also prevent the fridge slide from being extended.

To support the side wing panels, I installed L brackets that I got from Bunnings, riveted into the drawer sides. As mentioned above, the brackets closest to the drawer fronts run right into the tray sides to keep the whole arrangement stiff. The drawers can’t move from side to side.


The space under the left wing I use for bulky tools like a hammer, large spanner, mallet, machete, fishing rod holders, axe, shovel, and some oversized novelty sand pegs. The space under the right wing houses the auxiliary battery, compressor, 2500W true RMS inverter, solar regulator and lighting switch box.


Removable panels made of 12mm marine ply sit loose on top of the left wing, right wing and above the water tank. The side wing panels have cutouts to suit the brackets that hold the canopy down.

The removable panel above the water tank is supported by the back end of the drawers on one side and some small L-brackets screwed into the tray on the other side. A hole was cut to provide access to the water tank filler cap.

With all the panels removed, the drawers look like this:


The fridge power cable runs from the battery at the right side of the drawers, across the bottom, up the left side of the drawers, through a small cutout in the left wing panel and out to the fridge. For a guide on your 12V design, click here.

With the wings installed, the completed drawer system looks like this.


In terms of weight, I estimate the entire system comes in at around 65kg. Not super light, but I saved about 50kg on an equivalent steel systems with 2 x full length slide out shelves. The aluminium drawer internals themselves were pretty light, but adding all the other panels and fittings accumulates the total weight. The 1219mm full extension heavy duty runners are really heavy so having two slide out shelves contributes a lot of extra weight. I did not cover the ply panels with carpet. The fridge shelf doesn’t need it because the fridge will be over it. The slide out shelf is a food preparation bench so carpet is no good. For the other panels I thought I’d save myself the trouble and the extra weight and keep it raw. I oiled the ply with outdoor decking oil to give it some extra protection. The work bench I oiled with a special food grade wood oil, made from citrus trees. Without carpet it makes it easier to clean and it wont hold dirt. Inside the drawers I put some non-slip rubber matting to provide some cushioning and stop things rattling around.
These drawers and sliders have worked really well on our tour around Australia. The system is strong and practical. The drawers hold a lot of stuff and make it easy to access. The area on top of the drawers also provides a large storage platform for packing more gear. The fridge slide works really well but makes the fridge pretty high. It’s low enough to open and reach into, but if you want to look inside the fridge you need a step. We carry a small folding step for that purpose. The slide out work bench gets used every day and is really good. Whether camped up for a while or just pulling over on the side of the road to make lunch, it provides a quick and sturdy platform of pretty good area.
Checkout outbackjoe on facebook
See also:
After Market Add-ons and Other Camping / Touring Stuff
12V Design Guide – Dual Batteries, Inverters and Solar Panels
Camping / Touring / Travelling Phone and Internet Setup


nice work there mate
Where do you keep your second spare wheel?
Hey Jim we don’t have a second spare. No room inside or on the roof. I considered rear carrier but thought it might be annoying since we access the rear nearly every time we stop. I got a repair kit. If I get one irreparable tyre failure I’ll very carefully head to the nearest service centre. If I get two irreparable tyre failures I’ll be shoving grass in the tyre!
thanks, I have mine in the back, also easier to access than from underneath, but it does use up space.
Looks like a very handy setup…my hilux being an old 95 model I could n’t find a canopy for it, so had to make do with sturdy plastic crates under the tonneau. … stood up to the Gibb River rd Ok.
Hopefully my setup doesn’t fall apart on the Gibb. Heard many stories of stuff breaking, sounds like there’s a heap of corrugations.
HI JOE LOVE VIETNAM PHOTOS MY WIFE THAI ANYWAYS WHAT SIZE IS WATER TANK WHERE YOU BUY TA STEVE
Hi Cactusfizzy the water tank is 55 litres and I bought it from opposite lock I think.
Hey this is awesome.I am considering doing the same for my 2010 SR Hilux.
Cheers Aidan good luck with your drawers hopefully the result is a butt load of fun camping.
Awesome setup Joe, I am currently redoing my 98 Hilux trayback and searching for space saving ideas and yours has given me the inspiration I need. Cheers and keep up the good work.
Yo Brett glad to help! Good luck with your setup.